
frame
Howdy, Stranger!
It looks like you're new here. If you want to get involved, click one of these buttons!
Sign In RegisterHowdy, Stranger!
It looks like you're new here. If you want to get involved, click one of these buttons!
Quick Links
Categories
- 1.3K All Categories
- 7.3K General
- 6.2K General Discussions
- 411 Feature Request/Bug Report
- 545 Sales Questions and Answers
- 54 Time4VPS Life
- 242 Help requests
- 244 Server management
- 379 Tutorials
- 68 Various Tutorials
- 61 Web hosting control panels
- 133 Performance and Security
- 29 Web Applications
- 63 Linux Applications
- 25 Windows VPS


Howdy, Stranger!
It looks like you've been lurking for a while.
If you register, we also will remember what you have read and notify you about new comments. You will also be able to participate in discussions.
So if you'd like to get involved, register for an account, it'll only take you a minute!
Lynis and ClamAV installation
 Valentine
Member
Valentine
Member
Lynis is an open-source security auditing tool. Used by system administrators, security professionals, and auditors, to evaluate the security defenses of their Linux and UNIX-based systems. It runs on the host itself, so it performs more extensive security scans than vulnerability scanners.
ClamAV is an open-source (GPL) anti-virus engine used in a variety of situations including email scanning, web scanning, and endpoint security. It provides a number of utilities including a flexible and scalable multi-threaded daemon, a command-line scanner and an advanced tool for automatic database updates.
0. Preliminary requirements:
"CentOS 7" template installed on the server;
"nano" text editor installed (yum install nano -y).
1. Installation of Lynis
mkdir /usr/local/lyniscd /usr/local/lyniswget https://downloads.cisofy.com/lynis/lynis-2.7.5.tar.gz
tar -xvf lynis-2.7.5.tar.gzThe newest version can be found at: https://cisofy.com/download/lynis/
2. Using Lynis
To execute Lynis we first have to move to its folder:
cd /usr/local/lynis/lynisIn order to see Lynis tutorial execute:
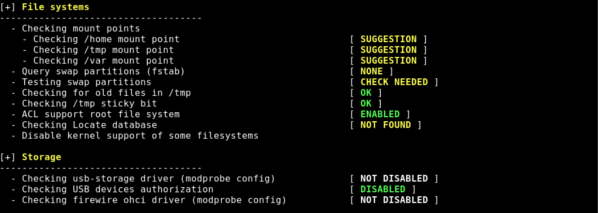
./lynisTo check entire VPS execute:
./lynis --check-all
1. Installation of ClamAV
yum install epel-releaseyum updateyum install clamav-server clamav-data clamav-update clamav-filesystem clamav clamav-scanner-systemd clamav-devel clamav-lib clamav-server-systemd2. Enabling Freshclam
Freshclam will keep ClamAV up-to-date. In this tutorial, it is set to check 4 times a day for new files.
cp /etc/freshclam.conf /etc/freshclam.conf.baksed -i '/Example/d' /etc/freshclam.confEdit "clam-freshclam.service" file:
nano /usr/lib/systemd/system/clam-freshclam.serviceAnd paste the content:
# Run the freshclam as daemonEnabling freshclam to start automatically:
[Unit]
Description = freshclam scanner
After = network.target
[Service]
Type = forking
ExecStart = /usr/bin/freshclam -d -c 4
Restart = on-failure
PrivateTmp = true
[Install]
WantedBy=multi-user.target
systemctl enable clam-freshclam.servicesystemctl start clam-freshclam.serviceTo manually update ClamAV virus database use the following command:
freshclam3. Configuring ClamAV deamon
Now we have to change the clamd service file:
And enable clamd to start automatically:
cp /usr/share/clamav/template/clamd.conf /etc/clamd.d/clamd.confsed -i '/Example/d' /etc/clamd.d/clamd.conf mv /usr/lib/systemd/system/clamd@.service /usr/lib/systemd/system/clamd.serviceNow we have to change the clamd service file:
nano /usr/lib/systemd/system/clamd.service
[Unit]Now move to "system" directory:
Description = clamd scanner daemon
After = syslog.target nss-lookup.target network.target
[Service]
Type = simple
ExecStart = /usr/sbin/clamd -c /etc/clamd.d/clamd.conf --nofork=yes
Restart = on-failure
PrivateTmp = true
[Install]
WantedBy=multi-user.target
cd /usr/lib/systemd/systemAnd enable clamd to start automatically:
systemctl enable clamd.servicesystemctl start clamd.service4. Manual scan options
To scan all files on the VPS and show name of each file:
To scan all files on the VPS, but only show names of infected files when found:
To scan all files on the VPS, but only show names of infected files, while scan running in the background (while in progress, you can check the scan with "jobs" command):
To scan all files in all users home directories:
To scan all files in the USER directory and move infected files to different Quarantine directory:
To scan all files on the VPS and show name of each file:
clamscan -r /To scan all files on the VPS, but only show names of infected files when found:
clamscan -r -i /To scan all files on the VPS, but only show names of infected files, while scan running in the background (while in progress, you can check the scan with "jobs" command):
clamscan -r -i / &To scan all files in all users home directories:
clamscan -r /homeTo scan all files in the USER directory and move infected files to different Quarantine directory:
clamscan -r --move=/home/USER/Quarantine /home/USERTo scan all files in the USER directory and delete the infected files:
clamscan -r --remove /home/USERfoot
Feel free to join our constantly expanding community, participate in discussions, strengthen your knowledge on Linux and Windows server management!
© 2013 - 2025 Time4VPS. All rights reserved.
Comments