frame
Howdy, Stranger!
It looks like you're new here. If you want to get involved, click one of these buttons!
Sign In RegisterHowdy, Stranger!
It looks like you're new here. If you want to get involved, click one of these buttons!
Quick Links
Categories
- 1.3K All Categories
- 7.3K General
- 6.2K General Discussions
- 412 Feature Request/Bug Report
- 545 Sales Questions and Answers
- 54 Time4VPS Life
- 242 Help requests
- 244 Server management
- 381 Tutorials
- 68 Various Tutorials
- 63 Web hosting control panels
- 133 Performance and Security
- 29 Web Applications
- 63 Linux Applications
- 25 Windows VPS
Howdy, Stranger!
It looks like you've been lurking for a while.
If you register, we also will remember what you have read and notify you about new comments. You will also be able to participate in discussions.
So if you'd like to get involved, register for an account, it'll only take you a minute!
[Linux] SQLite3 installation on Ubuntu 20.04
 Ievaz
Administrator
SQLite is an extremely lightweight and widely used SQL database engine. It is an efficient database engine that is implemented in C. This tool is quite useful for managing databases because it has the ability to interface with many different programming languages. Most Linux distributions can install SQLite3 from their repositories. However, there are repository versions that might be outdated or miss newer features in the latest SQLite3.
So in this tutorial, I will show how to install SQLite3 from the official source code. After the installation of SQLite, I will show how to create a simple database, then how to read data from it, insert items and delete items.
Requirements
Installed Ubuntu 20.04 operating system.
Installation
Before installing SQLite3 database management system, you need to update your server and install build-essential package:
apt-get update
apt-get install build-essential
After that, you can start configuring SQLite3.
1. SQLite3 packet download
Firstly, you need to download SQLite3 packet. The newest version you can find here. You will need to copy the .tar.gz file link from the Source Code. Then write that in the command and write which version you will install:
cd ~
mkdir sqlite3 && cd sqlite3
wget http://www.sqlite.org/sqlite-autoconf-version.gz
tar xvfz sqlite-autoconf-version.tar.gz
2. SQLite3 installation and configuration
cd sqlite-autoconf-version
./configure
make
sudo make install
After that, you can check the installed version with this command:
sqlite3 --version
Also, SQLite can be installed and with these commands:
sudo apt update
sudo apt install sqlite3
Working with SQLite3
1. The database creation
The database can be created with the command sqlite3. So now we will create the database with a name - time4vps:
sqlite3 time4vps.db
However, if you have already created a file time4vps.db, SQLite will open a connection to it then, but if not, SQLite will create a file time4vps.db
After the database creation, you will receive an output:

2. the table creation of the SQLite database
SQLite databases are organized into tables and those tables store the information.
Now we will create a table and some columns with various data:
The plan number
The server's name
The server's type
The server's price per month.
So the command should look like this:
CREATE TABLE time4vps(number integer NOT NULL, name text NOT NULL, time4vpstype text NOT NULL, price integer NOT NULL);
Using NOT NULL makes that field required.
After creating a table, an empty prompt will return. So with down below provided command, we can add some values:
INSERT INTO tablename VALUES(values go here);
The example:
INSERT INTO time4vps VALUES (2, "Linux", "KVM", 3.99);
INSERT INTO time4vps VALUES (2, "Container", "OpenVZ", 2.99);
INSERT INTO time4vps VALUES (2, "Windows", "KVM", 3.99);
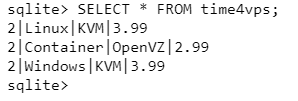
To view a table, you can use this command:
SELECT * FROM time4vps;
The output should look like this:

To view an entry based on its price (the values we set manually), add the WHERE command to your query:
SELECT * FROM time4vps WHERE price IS 2.99;

3. Updating tables
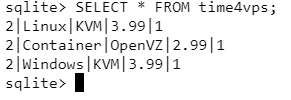
ALTER TABLE allows creating a new column. WIth down below provided command, we will add the information about CPUcores.
ALTER TABLE time4vps ADD COLUMN CPU integer;
With UPDATE command, we will be able to update the newly created column:
UPDATE time4vps SET CPU= 1 WHERE number=2;
UPDATE time4vps SET CPU= 1 WHERE number=2;
UPDATE time4vps SET CPU= 1 WHERE number=2;

4. Deleting tables:
With DELETE command you will be able to delete tables
DELETE FROM time4vps WHERE price <= 3.00;
The command will delete all servers from the time4vps table whose price is less than 3.00.

More information regarding SQLite’s syntax, you can find on the official documentation of SQLite.


